
 Stuka - music video creator for studio recording sessions
| [home] | [using Stuka] | [scripting 1/2] | [scripting 2/2] | [download] |
scripting Stuka (1/2)
overlay( 8mm, 100 ) {
capture( 17, 26, 692, 448 );
}
marker( 4, 1top_3bottom ) {
display( "gh1" );
display( "et1" );
display( "et2" );
..
capture( 17, 26, 692, 448 );
}
marker( 4, 1top_3bottom ) {
display( "gh1" );
display( "et1" );
display( "et2" );
..
The main part of Stuka is a text file defined by the user to set up all the building operations.
Basically, the script contains different sections to describe:
First of all, you have to set up the output video file configuration, using the following command:
output( "output.avi", width, height, interpolation_type, "master_track.wav" );
Interpolation type determines the filter used to rescale input video frames.
Values can be: "fast_bilinear" (default), "bilinear", "bicubic", "x", "point", "area", "bicublin", "gauss", "sinc", "lanczos" or "spline"
It may be usefull to set it to "fast_bilinear" when working with previews, and to switch it to "bicubic" when dealing with final rendering, as long as "fast_bilinear" is faster but less accurate.
On the same topic, don't forget that a 640x360 rendering will be faster than a 1280x720 one.
The input wave track to insert may be a Wave file, PCM signed 16 bit, stereo at 44.1KHz.
Then, you have to consider a bunch of video files you've made during the recording sessions of a track:
input( iid, "input.mov", focus ) {}
Focus type can be: "center" (default), "top", "left", "bottom", "right", "top_left", "top_right", "bottom_left" or "bottom_right"
The focus is particularly important when you are using small viewport layouts (with five or six displays), because some cropping can occurs.
The cropping area will always be computed to display the focused part of your video.
All these videos are relative in time to the master track you have under your audio sequencer (ProTool, Cubase, Sonar or whatever you prefer), so it is really important to indicates how to anchors them in the timeline.
To do that, I personally use Virtual Dub to extract the audio part of an input video file (open the video file and use the "File/Save WAV" menu), then I use Goldwave to search a point in the input video file WAV (a distinct beat), to note the point position in millisecond and then search the equivalent point in the master WAV track (it's easy to find it directly onto your sequencer) and note its position.
By these operations, you are able to anchors a point in input video file relatives to master track, using:
input( iid, "input.mov", focus, anchorMs, TLAnchorMs ) {}
by default, both anchors are set to 0 millisecond.

As long as you got a lot of different input video sources, it may be important to adjust their images:
input( iid, "input.mov" ) {
color_balance( CR, MG, YB );
brightness( b );
contrast( c );
saturation( s );
noise_reduction( level );
vertical_flip( flip );
}
color_balance( CR, MG, YB );
brightness( b );
contrast( c );
saturation( s );
noise_reduction( level );
vertical_flip( flip );
}
the noise amount (temporal), 'level' is in percent (0: no NR (default), 100: full NR, try 6% for happiness !)
'flip' values can be: "auto" (autodetection, by default), "true" or "false"
The best way to adds a new input with correct image adjustment settings is to use the adjustment panel.
To help with future markers creation and cycle layout, we can determine groups:
group( gid ) { iid, iid, gid, ... }
Note than you can create a group including some input AND some previously defined groups
When working with preview, it's really usefull to bound the range of markers to compute:
range( begin_pos, end_pos );
On the same topic, it may be really usefull to display some debug information:
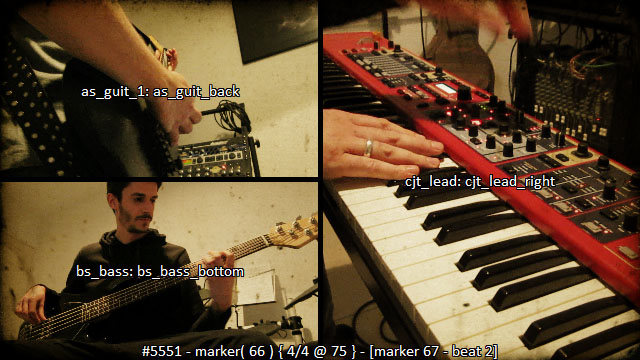
debug();
this command adds frame count, input marker position, signature and tempo, interpolated marker position / beat count, and viewport input iid and gid.
